随着时间的推移,我们对Magento 2结帐越来越熟悉。我们正在努力进一步增长我们的知识。通过本篇博客,我们将了解如何更改结账页面上的输入字段排序。
如果您曾经使用过Magento 2,那么您就熟悉默认的Magento 2结账字段排序:
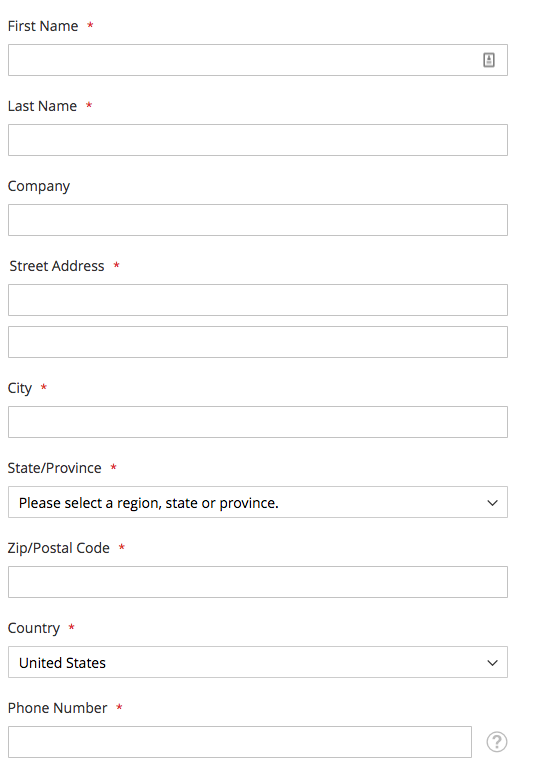
对于美国或其他国家/省份重要且必需的国家,此排序完全可以理解。但在大多数欧洲国家,州/省并非如此。在这里,大多数欧盟客户期望其他一些领域,例如邮政编码或国家/地区具有更高的优先级。
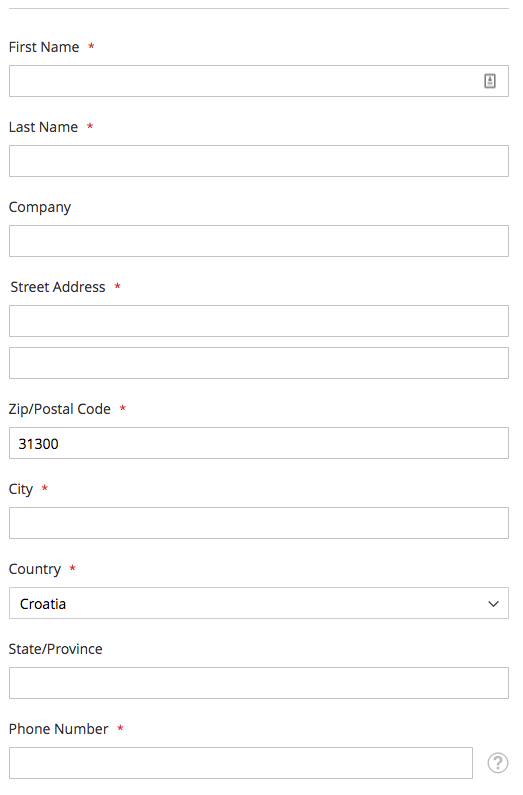
牢记这一点,我们希望更改默认的Magento 结账字段排序顺序以满足我们的需求。所以,我们想要实现这样:
如果您有不同的想法,也没有问题,请按照本篇博客的介绍更改字段排序值。
我们也希望保持一致性,考虑所有结账步骤,以便我们将在“发货和账单”步骤中重新排序输入字段。
发货步骤
在发货步骤中重新排序字段是一项简单的任务,我们只需要知道相关字段的排序顺序值和几个xml Magento 2特定命令。
首先,我们需要有自己的checkout_index_index布局覆盖。如果没有,请创建checkout_index_index xml文件,以便我们能够以适当的Magento方式操作结账页面布局。文件路径:
/app/design/frontend/Vendor/themeName/Magento_Checkout/layout/checkout_index_index.xml新的布局文件需要有明确的结构树才能定位正确的元素Checkout UI组件,如下所示:
<referenceBlock name="checkout.root">
<arguments>
    <argument name="jsLayout" xsi:type="array">
        <item name="components" xsi:type="array">
            <item name="checkout" xsi:type="array">
                <item name="children" xsi:type="array">
                    <item name="steps" xsi:type="array">
                        <item name="children" xsi:type="array">
                            <item name="shipping-step" xsi:type="array">
                                <item name="children" xsi:type="array">
                                    <item name="shippingAddress" xsi:type="array">
                                        <item name="children" xsi:type="array">
                                            <!-- The name of the form the field belongs to -->
                                            <item name="shipping-address-fieldset" xsi:type="array">
                                                <item name="children" xsi:type="array">

                    <!— Start: Important part —>

                                                    <item name="postcode" xsi:type="array">
                                                        <item name="sortOrder" xsi:type="string">71</item>
                                                    </item>

                                                    <item name="country_id" xsi:type="array">
                                                        <item name="sortOrder" xsi:type="string">81</item>
                                                    </item>
                    <!— End: Important part: —>

                                                </item>
                                            </item>
                                        </item>
                                    </item>
                                </item>
                            </item>
                        </item>
                    </item>
                </item>
            </item>
        </item>
    </argument>
</arguments>
</referenceBlock>
有很多嵌套和子元素,但是在shippingAddress项下,我们的目标是两个输入字段的子元素。如果你仔细观察,可以发现我们的目标是:
- 邮政编码字段(
postcode) - 国家字段(
country_id)
为了改变这些元素的位置(邮政编码和国家),我们需要更新sortOrdering值,以便按照我们的想法排序。默认情况下postcode,sortOrder的值为110,country_id的值为115。我们用71和81更新它们,在这种情况下,目标字段将更好地适应我们的新布局。
清除Magento缓存,重新加载Checkout页面,您会看到到变化。
此外,我们需要指出的是,XML布局更新还会影响Checkout地址弹出窗口,当注册客户希望在第一个结帐步骤中添加具有已存在地址的新地址时,该弹出窗口将可见。
账单步骤
更改账单步骤的方法与发货步骤不同,因为账单步骤是基于动态UI组件构建。目前,最重要的是要知道,在账单步骤中,每种付款方式都使用不同的账单地址表单(每种付款方式都有不同的组件)。因此,我们需要为我们在结帐时使用的所有付款方式应用布局更改,但就本文而言,我们将仅涵盖Check / Money payment方式。
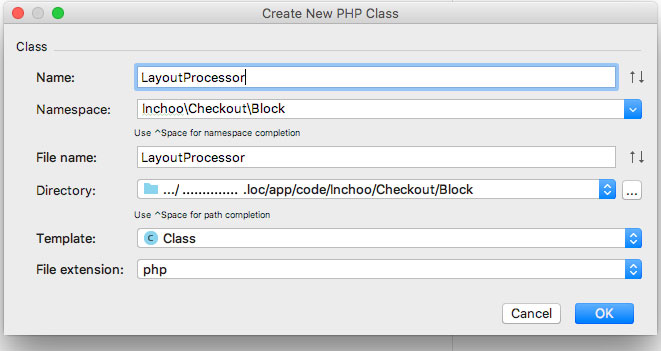
因此,我们将扩展账单步骤的默认Magento布局处理器接口。这将需要一点PHP知识,但考虑到必要的工作水平,做到这一点并不会太复杂。请通过在Checkout Block目录下创建新的PHP类文件来扩展LayoutProcessorInterface:
/app/code/Vendor/Checkout/Block/LayoutProcessor.php
我们的起始点将使用简单的方法检查:
namespace Magease\Checkout\Block;

use Magento\Checkout\Block\Checkout\LayoutProcessorInterface;

class LayoutProcessor implements LayoutProcessorInterface
{
    public function process($jsLayout)
    {
        return $jsLayout;
    }
}为了配置我们还需要创建di.xml,以便Magento了解布局处理器的更改。XML文件将包含以下代码:
<?xml version="1.0"?>
<config xmlns:xsi="http://www.w3.org/2001/XMLSchema-instance" xsi:noNamespaceSchemaLocation="urn:magento:framework:ObjectManager/etc/config.xsd">
    <type name="Magento\Checkout\Block\Onepage">
        <arguments>
            <argument name="layoutProcessors" xsi:type="array">
                <item name="checkoutFieldsReorder" xsi:type="object">Magease\Checkout\Block\LayoutProcessor</item>
            </argument>
        </arguments>
    </type>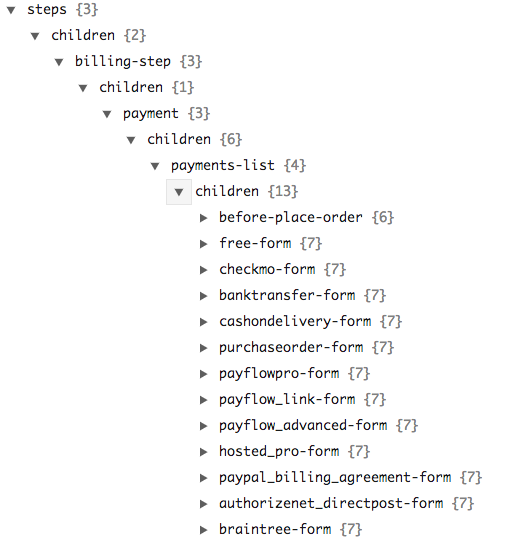
</config>我们需要确保在账单步骤中定位正确的UI组件。为此,请检查Magento knockout在前端给我们的JSON对象,您可以通过IDE或某些JSON在线编辑器来实现。在Checkout JSON中找到要重新定位的元素的sortOrder值。在JSON树之后,我们将声明与$jsLayout数组相同的路径。基本上,我们会这样做:
namespace Magease\Checkout\Block;

use Magento\Checkout\Block\Checkout\LayoutProcessorInterface;

class LayoutProcessor implements LayoutProcessorInterface
{
    /**
     * Reposition postcode to be above city input, and country drop down to be above region
     *
     * @param array $jsLayout
     * @return array
     */
    public function process($jsLayout)
    {
        $jsLayout['components']['checkout']['children']['steps']['children']
        ['billing-step']['children']['payment']['children']
        ['payments-list']['children']['checkmo-form']['children']
        ['form-fields']['children']['postcode']['sortOrder'] = 71;

        $jsLayout['components']['checkout']['children']['steps']['children']
        ['billing-step']['children']['payment']['children']
        ['payments-list']['children']['checkmo-form']['children']
        ['form-fields']['children']['country_id']['sortOrder'] = 81;

        return $jsLayout;
    }
}
清除缓存并重新加载页面。您将看到变化。
如果您希望为其他方式更改布局,请随意执行此操作。你只需要用你的付款方式替换[checkmo-form],但请确保您在Checkout上使用哪种方法。至少检查JSON对象以及在payment-list表项下可用的表单。原因是,有时payment-list可能看起来像这样: