我们已经讨论了如何配置集成和使用Magento api。现在,让我们看看如何使用自定义API调用创建自己的模块。
模块要点
为了更简单的开始,您应该阅读以下文章:“Magento2 创建基础模块并创建一个基本模块。对于此示例模块,您只需要两个文件,module.xml和register.php。我将在Magease名称空间下创建模块并将其命名为Hello。
模块配置 - etc/module.xml
<?xml version="1.0"?>
<config xmlns:xsi="http://www.w3.org/2001/XMLSchema-instance" xsi:noNamespaceSchemaLocation="urn:magento:framework:Module/etc/module.xsd">
    <module name="Magease_Hello" setup_version="1.0.0" />
</config>
注册 - registration.php
<?php
\Magento\Framework\Component\ComponentRegistrar::register(
    \Magento\Framework\Component\ComponentRegistrar::MODULE,
    'Magease_Hello',
    __DIR__
);
API配置
我们还需要另外两个配置来为模块,webapi.xml和di.xml添加API功能。在webapi.xml中,配置指定方法使用的访问权限和API接口。
Web API配置 - etc/webapi.xml
<?xml version="1.0"?>
<routes xmlns:xsi="http://www.w3.org/2001/XMLSchema-instance" xsi:noNamespaceSchemaLocation="urn:magento:module:Magento_Webapi:etc/webapi.xsd">
    <route url="/V1/hello/name/:name" method="GET">
        <service class="Magease\Hello\Api\HelloInterface" method="name"/>
        <resources>
            <resource ref="anonymous"/>
        </resources>
    </route>
</routes>
Resource标签定义了用户访问这个api调用所需的资源。可能的选项是self、anonymous或Magento资源,比如Magento_Catalog::products或Magento_Customer::group。我们现在将使用匿名,这样我们就可以作为客人访问它。
定义接口 - etc/di.xml
<?xml version="1.0"?>
<config xmlns:xsi="http://www.w3.org/2001/XMLSchema-instance" xsi:noNamespaceSchemaLocation="urn:magento:framework:ObjectManager/etc/config.xsd">
    <preference for="Magease\Hello\Api\HelloInterface"
                type="Magease\Hello\Model\Hello" />
</config>在di.xml中,我们定义接口调用的模型。我们还需要添加界面和模型。
接口 - Api/HelloInterface.php
<?php
namespace Magease\Hello\Api;

interface HelloInterface
{
    /**
     * Returns greeting message to user
     *
     * @api
     * @param string $name Users name.
     * @return string Greeting message with users name.
     */
    public function name($name);
}
模型 - Model/Hello.php
<?php
namespace Magease\Hello\Model;
use Magease\Hello\Api\HelloInterface;

class Hello implements HelloInterface
{
    /**
     * Returns greeting message to user
     *
     * @api
     * @param string $name Users name.
     * @return string Greeting message with users name.
     */
    public function name($name) {
        return "Hello, " . $name;
    }
}在模型中,我们添加了通过调用API方法执行的功能。在这种情况下,它会将Hello追加到call提供的名称并以字符串形式返回。
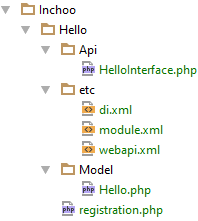
有了这些,你的模块应该是这样的:
与新API调用进行通信
作为客人测试
要测试REST,您可以转到http://{domain_name}/rest/V1/{method}/{attribute}/{value}。
示例:http://magento2.loc/rest/V1/hello/name/Jim.。
以下是此示例的响应方式:
<response>Hello, Jim</response>下面是测试相同API调用但使用SOAP的代码:
<?php
$proxy = new SoapClient('http://magento2.vm/index.php/soap/default?wsdl&services=mageaseHelloV1');
$result = $proxy->mageaseHelloV1Name(array("name"=>"Jim"));
var_dump($result);
SOAP的响应
object(stdClass)#2 (1) {
  ["result"]=>
  string(10) "Hello, Jim"
}
添加ACL
如果我们不在webapi.xml的资源中设置匿名,我们需要设置现有的Magento资源或创建自己的资源,我们可以通过添加acl.xml等来做到这一点。
ACL - etc/acl.xml
<?xml version="1.0"?>
<config xmlns:xsi="http://www.w3.org/2001/XMLSchema-instance" xsi:noNamespaceSchemaLocation="urn:magento:framework:Acl/etc/acl.xsd">
    <acl>
        <resources>
            <resource id="Magento_Backend::admin">
                <resource id="Magease_Hello::hello" title="Hello" translate="title" sortOrder="110" />
            </resource>
        </resources>
    </acl>
</config>
在这种情况下,我们需要将“Magease_Hello::hello”添加到webapi.xml资源而不是匿名。
在文章Magento 2 API的示例,我们介绍了如何使用REST或SOAP API连接到Magento,我们可以使用相同的示例来创建新的集成并测试API调用的新实现。